DNS is like a phone book of the Internet. Instead of storing phone number look-ups like John Doe @ (555) 867-5309 It stores IP address look ups like Google.ca @ 64.233.183.94
Your computer's DNS cache is a temporary record of the locations of web servers (by IP address) which your computer has recently visited. If the actual IP address of the server changes before your computer's record of it's location updates, you will be routed to the old IP address for the server.
Essentially your computer is travelling with an out of date map of the internet.
To fix this we need to get rid of the out of date info. This usually happens automatically but sometimes we need to hurry things along.
After you clear your DNS cache, your computer will fetch new DNS information.
Jump to: Windows | Mac OS X | iOS Devices | Android Devices
Windows
Windows 8
To clear your DNS cache if you use Windows 8, perform the following steps:
- On your keyboard, press Win+X to open the WinX Menu.
- Right-click Command Prompt and select Run as Administrator.
-
Run the following command:
ipconfig /flushdns
If the command succeeds, the system returns the following message:
Windows IP configuration successfully flushed the DNS Resolver Cache.Windows 7
To clear your DNS cache if you use Windows 7, perform the following steps:
- Click Start.
- Enter cmd in the Start menu search text box.
- Right-click Command Prompt and select Run as Administrator.
-
Run the following command:
ipconfig /flushdnsIf the command succeeds, the system returns the following message:
Windows IP configuration successfully flushed the DNS Resolver Cache.Windows XP, 2000, or Vista
To clear your DNS cache if you use Windows XP, 2000, or Vista®, perform the following steps:
- Click Start.
- On the Start menu, click Run….
- If you do not see the Run command in Vista, enter run in the Search bar.
-
Run the following command in the Run text box:
ipconfig /flushdns
If the command succeeds, the system returns the following message:
Successfully flushed the DNS Resolver Cache.Mac
MacOS 10.10
To clear your DNS cache if you use MacOS X version 10.10, perform the following steps:
- Click Applications.
- Click Utilities.
- Click Terminal.
-
Run the following command:
sudo discoveryutil mdnsflushcacheIf the command succeeds, the system does not return any output.
!!!warning Note:
To run this command, you must know the computer’s Admin account password.
MacOS 10.7, 10.8, and 10.9
To clear your DNS cache if you use MacOS X version 10.10, perform the following steps:
- Click Applications.
- Click Utilities.
- Double-click Terminal.
-
Run the following command:
sudo killall -HUP mDNSResponderIf the command succeeds, the system does not return any output.
!!!warning Note:
To run this command, you must know the computer’s Admin account password.
MacOS 10.5 and 10.6
To clear your DNS cache if you use MacOS X version 10.5 or 10.6, perform the following steps:
- Click Applications.
- Click Utilities.
- Double-click Terminal.
-
Run the following command:
sudo dscacheutil -flushcache
If the command succeeds, the system does not return any output.
!!!warning Note:
To run this command, you must know the computer’s Admin account password.
iOS Devices
In OS X we use terminal to clear DNS cache, but in iOS there is no terminal. You have 3 possibilities to clear dns cache in iOS. They are presented here in order of easiest to hardest. These methods work the same for all iPhone, iPad, and iPod touch devices.
-
Switching to Airplane mode. Airplane Mode completely disables all network connectivity until you turn it off and has the side effect of flushing the DNS cache of the device.
Older iOS devices
Go to Settings and turn ON Airplane Mode wait 5-10 seconds and then turn it off.


iOS 7 and newer
With iOS 7 is possible to switch even faster. Pull up bottom menu and press on Airplane Mode button, wait 5-10 seconds and then press again to disable it.
- Swipe up from the bottom of the device’s screen to reveal Control Center
- Tap on the Airplane Icon to enable Airplane Mode – wait until the devices radio signals are off as indicated by the airplane logo in the status bar, then tap again on the Airplane Icon to disable Airplane Mode
- Swipe down to leave Control Center, the DNS cache has been flushed successfully


Now that DNS has been cleared out, whatever adjustments were made in the devices Network Settings will take effect immediately without any further action.
Rarely, the Airplane Mode toggle does not work sufficiently to clear out some persistent DNS caches, though it always should, perhaps it’s a bug in the unusual scenarios where it does not work sufficiently. If that’s the case, you have another option to clear out the caches, which we’ll cover next.
-
Reboot your device. Press and hold the power button until presented with the
Slide to power off
prompt. Slide the slider to turn your device off. Once it’s shut down, press the power button again to restart the device. -
Settings dump.
Resetting the iOS devices network settings is a surefire way to flush all old DNS settings if you made adjustments and for some reason or another they were not maintained. The downside to this is that you’ll lose connections to wi-fi routers and other specific network settings. Additionally, this reboots the device, which is actually another way to clear DNS cache anyway.
- Open the “Settings” app in iOS and head to “General” followed by “Reset”
- Choose “Reset Network Settings” and confirm that you wish to clear out all network settings (though no specified, this includes all DNS data)
- When the device reboots, the DNS cache will be cleared out but so will all other customizations, meaning you’d need to set a manual change made to DNS servers again

This latter approach is rarely necessary, and though it’s not as simple as the AirPlane switch or the Mac command line approach offered to flush DNS details in new versions of OS X, it does work if all else fails.
That should be all that is necessary to clear out stale DNS cache from your iOS devices. Keep in mind that sometimes your local device DNS settings are not going to make a difference if what you’re waiting for is DNS propagation changes from elsewhere around the internet, which can take quite a while for DNS changes to carry over between servers around the world.
Android devices
To clear the DNS cache, you could do a hard reset of your Android phone. Take out the battery for thirty seconds then replace it and turn on your phone; the DNS cache should be empty. However, many, if not most, phones do not have removable batteries. Happily, you can also clear your browsing history, thus flushing the DNS cache, through your browser settings.
Jump to: Chrome | Firefox | Opera
Chrome on Android
-
Type
chrome://net-internals/#DNSinto the Chrome search bar.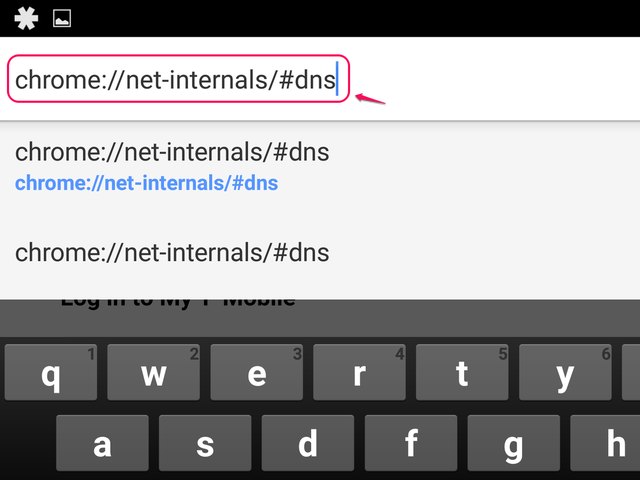
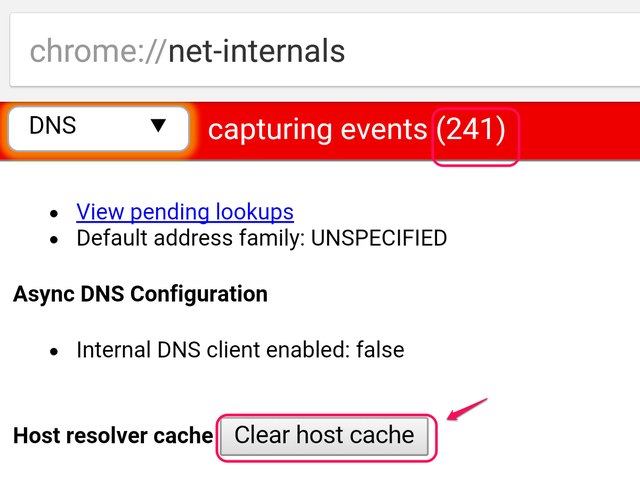
-
Click the Clear Host Cache button. The number of domain names held in cache can be seen in the bar at the top of the screen next to Capturing Events. This number will change to zero.
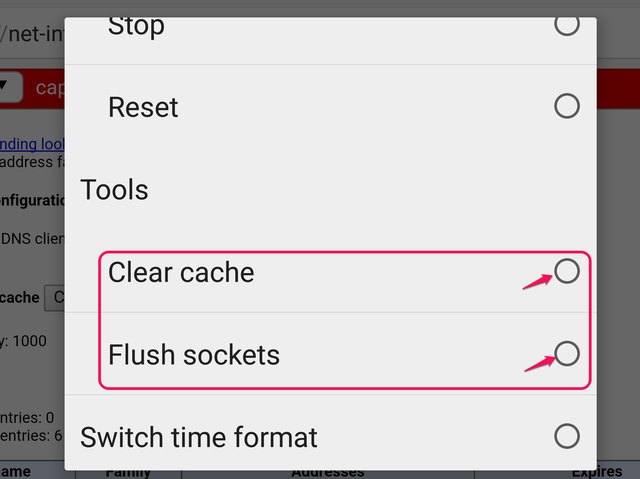
-
Clear both the Sockets, as well as the DNS Cache, to clear out any lingering packets. To do this, click the Down Arrow in the upper right corner. This is an alternative to clicking the Clear Host Cache button.

-
Select Clear Cache and Flush Sockets. If you are selecting both, you have to open the menu twice. The menu closes as soon as you select one.
Firefox on Android
-
Click the menu in the upper-right corner to access the main menu and then click Settings.
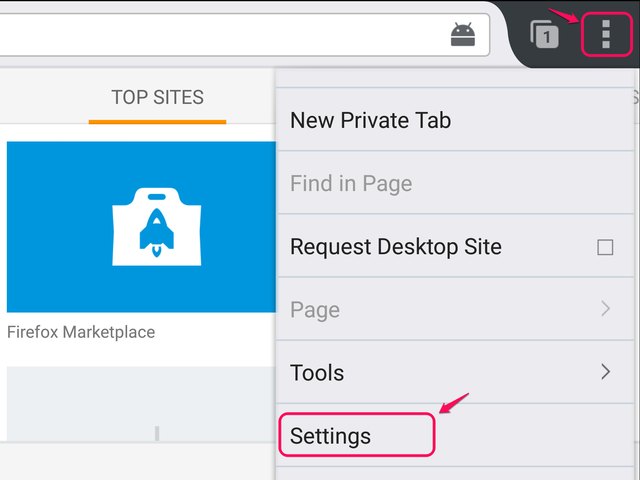
-
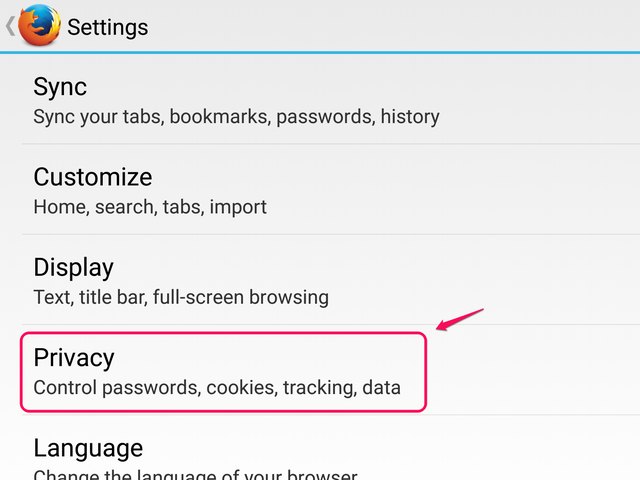
Select Privacy from the Settings menu.
-
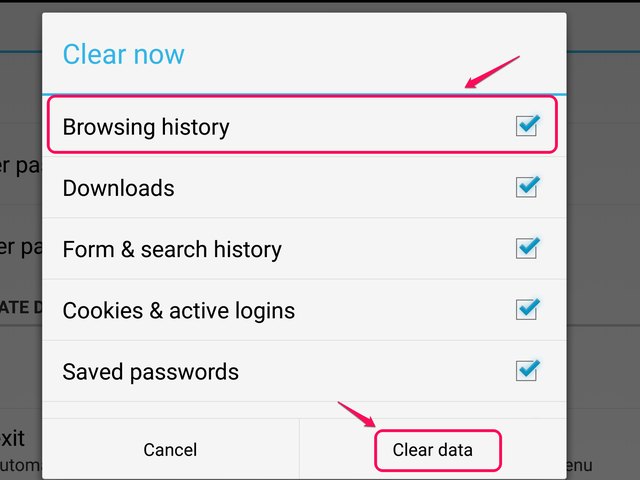
Select Clear Now. There is also a check box to select if you want your browsing history to be deleted every time you exit Firefox.

-
Check the box next to Browsing History and then click Clear Data.
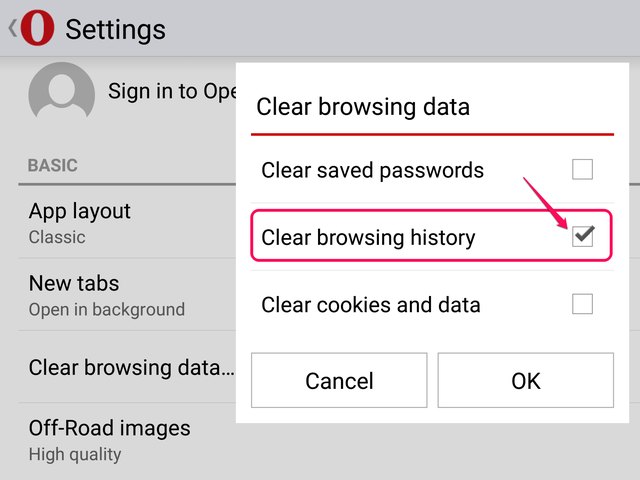
Opera on Android
-
Click the Opera icon at the bottom of your Opera Browser.

-
Select Clear Browsing Data from the Settings menu.

-
Check the box next to Clear Browsing History and then click OK.